Tinkla Buddy

| What is Tinkla Buddy? | Tinkla Buddy Install Kit | Installing your Tinkla Buddy | Configuring your Tinkla Buddy |
What is Tinkla Buddy?
Tinkla Buddy (formerly rPanda) is a nice solution for our Teslas to have Instrument Cluster [IC] integration without root.
If you don't have root access to your Tesla, you can now enjoy these benefits:
- OpenPilot Integration into IC for pre-AP cars.
- In car WiFi Access Point
- Remote App (work in progress)
- Vitals to Tinkla
- Factory mode
- and More!
The entire Tinkla Buddy install costs about $200 USD, depending where your source components. There will be a subscription of $150 for the first year and $100 for each subsequent year. Subscription fees will be used to maintain the remote access and licensing server for the Remote App and other remote services.
Contents
History
v1.36
- Fix screenshot capturing script
- Fix issues with detecting MCU1 vs MCU2
- Added sound triggering capabilities on CID
- Fix issues when running old firmware and cid-updater is not working anymore
v1.33
- Tesla 2020.24.6.1 compatibility
- Remote cron capabilities that allow you to run bash scripts on CID every 1, 5, 15 or 60 minutes (requires root persistence)
- Fixes for persistence scripts to work well with 2020.20 and newer Tesla software
- Speed/reliability improvements
v1.27
- Fully boot without being connected to either IC or CID
- Reduce number of QtCar restarts by detecting IC state
- Increase automatically switch back to analog to 5 min to allow for buddy reboots without changes to IC
- Increase number of checks for state of IC and CID before pulling Vitals
v1.26
- Allow Buddy to boot without IC/CID on
- Bug fix for IC not turning on after deep sleep
(Note: Vitals need to be re-enabled after each version upgrade)
v1.25
- Bug fix for vitals without root on latest versions (up to 2020.12.11.5)
- Bug fix with Factory Mode on latest versions (up to 2020.12.11.5)
- Detects automatically if cars has AP hardware (1/2/2.5/3)
- Detects automatically if car has MCU1 or MCU2 hardware
- Vitals checking is an option now in Tinkla Menu and is disabled by default
v1.22
- Fully redesigned networking stack for faster response on boot, activation and interaction
- Now Tinkla Buddy can be installed between IC and MCU (IC <--> Buddy <--> MCU) or between MCU and APE (MCU <--> Buddy <--> APE) allowing it to work on both MCU1 and MCU2 cars.
- Auto-detection of MCU type (Tegra vs Intel)
- Auto-detection of AP type (pre-AP, AP1, AP2, AP2.5, AP3)
- Auto-detection of installation location
- Improved WiFi stability
v1.21
- Fixes issue with starting persistence mode
- LEDs now show status of tinklaBuddy and availability of valid cert
v1.20
- Menu button trigger for Tinkla Menu for older (LIN based) steering wheel controls
- Fixes brightness control
- Resolves issue with crash when car would go in sleep mode
Configuration / Setup
There are two ways to easily setup and configure your Tinkla Buddy after install.
- Using the Tinkla Menu
- Using the Tinkla Access Point webapp
- Using Tinkla Bastillion Server (Advanced)
Using the Tinkla Menu
The Tinkla Menu has various basic configuration settings you can activate. You can activate the menu with either four presses on the Wheel's Menu button or (if you're parked) four presses on the Parking Brake.
If you plan to use email to send screenshots, please make sure you setup your email address correctly in /home/pi/.tinkla/email_settings. Please allow at least 20 seconds between requests to allow the command to complete. CID screen shot only works if you have persistence enabled.

- Tinkla
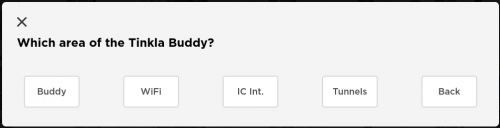
- Buddy
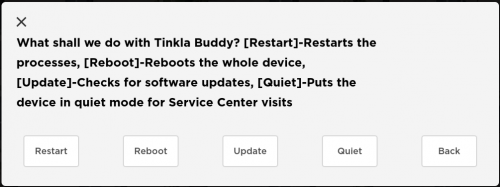
- Restart - Restarts Tinkla Buddy's processes.
- Reboot - Reboots Tinkla Buddy, entirely. (Not recommend)
- Update - Checks for a Tinkla Buddy update.
- Quiet - Puts the device in a quiet mode for Service Center visits.
- Wifi
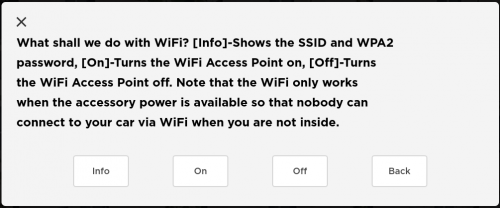
- Info - This shows the current Wireless Access Point name and password to join the network and use your car's 3g or LTE internet.
- IC Int. - Here you can Turn Integration On or Off
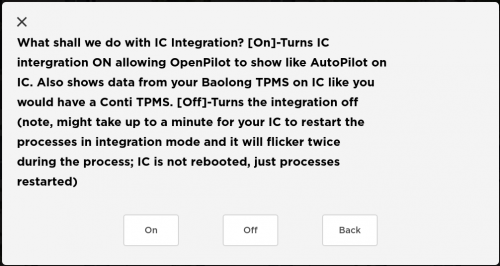
- IC integration allows OpenPilot to appear on the Instrument Cluster similar to Tesla AutoPilot. It also shows data from your Baolong TPMS as if you have a Conti TPMS retrofit.
- Please note: it can take up to a minute for your IC to restart the processes in integration mode and it will flicker twice during the process. The IC isn't rebooted, just restarting processes.
- Tunnels - Here you can turn Tunnels On or Off
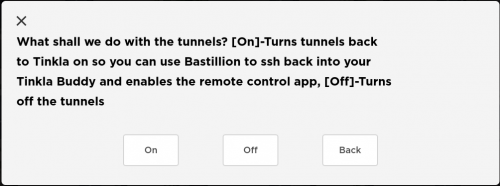
- Turning tunnels on allows you to use the Tinkla Bastillion server to SSH into your Tinkla Buddy and it enables the remote control app (in development)
- Buddy
- Tesla
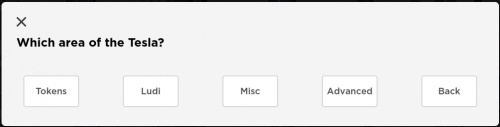
- Tokens - If you are a security researcher and have access to your car's systems, you'll be able to see it here.
- Ludi
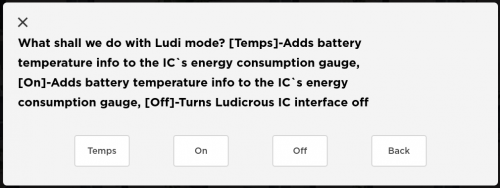
- Temps - This option adds a temperature gauge to the bottom left third of the power graph when using IC Int.
- On - This option adds the temperature gauge from above, shows a wireframe of your car exposing front and rear motors, and adds a power value and peak usage graph to the left side of your IC.
- Off - Disables all of the Ludi additions.
- Misc
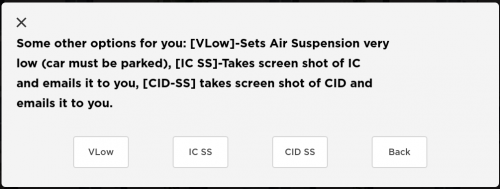
- VLow - Sets air suspension very low (your car must be parked to enable).
- IC SS - <Known Bug> This will take a screenshot of your IC and email it to you. (You'll need to SSH into Tinkla Buddy to configure
/home/pi/.tinkla/email_settings) - CID SS - This will take a screenshot of your Central Infotainment Display [CID] and email it to you. (You'll need to SSH into Tinkla Buddy to configure
/home/pi/.tinkla/email_settings). CID screen shot only works if you have persistence enabled!
- Advanced
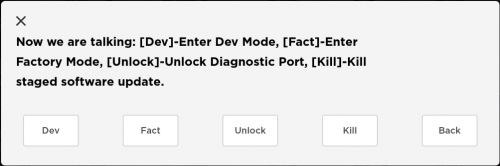
- Dev - This will enable you to access Dev Mode.
- Fact - This will enable you to enter Factory Mode.
- Unlock -This will unlock the Diagnostic Port.
- Kill - This will kill any staged software updates.
- Info
- ...
- Custom
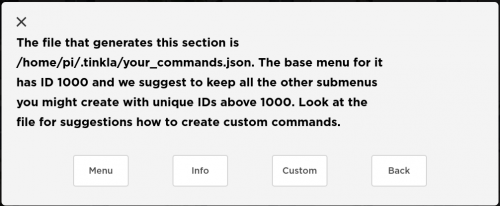
- This set of menus are for your use to add/run your own menu scripts to run from the Tinkla Buddy and show the results on your CID. All additions and changes will need to be added to your Tinkla Buddy via SSH to
/home/pi/.tinkla/your_commands.json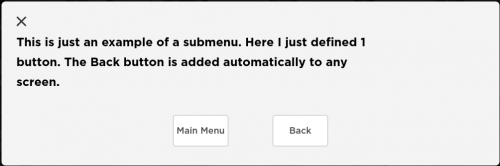
- This set of menus are for your use to add/run your own menu scripts to run from the Tinkla Buddy and show the results on your CID. All additions and changes will need to be added to your Tinkla Buddy via SSH to


Using the Tinkla Access Point webapp
Setup WiFi for access to Tinkla Buddy App.
First activate the TB on your CID using either the wheel menu button or (if parked) parking button four times. Select Tinkla.
Then select WiFi.

Then select On, to turn on the WiFi SSID.

On your Cell phone look for the SSID tinklaAP, the WiFi password is teslaFr33
.jpg)
Select the SSID and it will assign an IP (it may tell you there is no internet). The next thing to do is go to your favorite browser on the phone, and enter the following URL http://10.5.5.1
You will be presented with the log in screen. The first time password is 1234
Then of course hit Login
.jpg)
Now you can start exploring.
Using Tinkla Bastillion Server
This method is not recommended for initially setting up your Tinkla Buddy. This is a great way to tinker and customize some areas of your Tinkla Buddy and is only a Linux Command Line Interface [CLI].
Contact BogGyver for account setup and Authenticator setup.
From the Bastillion server you can gain SSH access to your Tinkla Buddy from anywhere in the world. With SSH access you can perform more intimate setup of your Tinkla Buddy so screenshots can be emailed to you or create your own custom menu options in the Tinkla Menus.
Custom Tinkla Menu
In the /home/pi/.tinkla folder there is a file called your_commands.json Where the custom menu items should be added. There are already examples in the file you can follow.
For long command sequences it is best to create a script in /home/pi/.tinkla and just call the script with something like /bin/bash /home/pi/.tinkla/my_script.sh from the your_commands.json.
{"menu":[
{"id":1000,"text":"The file that generates this section is /home/pi/.tinkla/your_commands.json. The base menu for it has ID 1000 and we suggest to keep all the other submenus you might create with unique IDs above 1000. Look at the file for suggestions how to create custom commands. ","options":[
{"label":"Menu","type":"menu","value":"1001"}, #this will open the menu defined as id:1001
{"label":"Reboot TB","type":"shell","value":"reboot"}, #this sends "reboot" as a command.
{"label":"Some Script","type":"shell","value":"/bin/bash /home/pi/.tinkla/my_script.sh"} #no comma after the last option.
]},
{"id":1001,"text":"This is just an example of a submenu. Here I just defined 1 button. The Back button is added automatically to any Menu.","options":[
{"label":"Main Menu","type":"menu","value":"1"}
]}                                                                                                              ]}
To run a script on the CID, and as long as you have persistence enabled, then you can include these commands inside my_script.sh to have some thing run on the CID:
scp CID_script.sh cid:/tmp/CID_script.sh
ssh cid bash /tmp/CID_script.sh
ssh cid rm /tmp/CID_script.sh
Cron Jobs
If you already have persistence setup, then you can have scripts set to run periodically based on where you place your script.sh. Based on the directory you use, you can have a script run afterReboot (MCU reboot, not Tinkla Buddy), every 1, 5, 15, or 60 minutes.
Scripts within these folders MUST have filenames ending in .sh.
/opt/tinkla/cron/afterReboot
/opt/tinkla/cron/everyOneMinute
/opt/tinkla/cron/everyFiveMinutes
/opt/tinkla/cron/everyFifteenminutes
/opt/tinkla/cron/everyHour
For those users that have root persistence, I recommend adding a clean_traces.sh file to the /opt/tinkla/cron/everyOneMinute folder containing the following code
sed -i '/192\.168\.90\.101/d' /var/log/sshd/current
sed -i '/key type ssh-dss not/d' /var/log/sshd/current
cat /dev/null > /var/log/auth.log
echo 'set +o history' > /root/.bashrc
cat /dev/null > /root/.bash_history
echo 'set +o history' > /home/tesla/.bashrc
cat /dev/null > /home/tesla/.bash_history
If you have root persistence and want the AutoPilot screen on CID, create a script called ap_screen.sh in the /opt/tinkla/cron/afterReboot folder containing this code:
edit-settings-conf.pl -a vapi/forceHasAutopilot=true
edit-settings-conf.pl -a vapi/forceHasDriveOnNav=true
edit-settings-conf.pl -a vapi/forceHasDriveOnNavMaps=true
/usr/local/bin/sdv GUI_autopilotAlwaysOn true
/usr/local/bin/sdv GUI_autosteerOnRequest true
/usr/local/bin/sdv GUI_autosteerDisabled false
/usr/local/bin/sdv GUI_accFromZero true
/usr/local/bin/sdv DAS_mapAvailability true
/usr/local/bin/sdv GUI_redLightStopSignOnRequest true
/usr/local/bin/sdv GUI_enableMapStops true
/usr/local/bin/sdv GUI_enableVisionStops true
/usr/local/bin/sdv GUI_enableFSDFunctions true
/usr/local/bin/sdv GUI_stopAndGo true
/usr/local/bin/sdv GUI_noaEverywhere true
/usr/local/bin/sdv DAS_navAvailable true
/usr/local/bin/sdv GUI_accFollowDistance 2
/usr/local/bin/sdv GUI_accOvertakeOnRequest true
/usr/local/bin/sdv GUI_autopilotControlRequest 0
/usr/local/bin/sdv FEATURE_dasDriveOnNavEnabled true
/usr/local/bin/sdv FEATURE_dasDriveOnNavMapsOkay true
/usr/local/bin/sdv VAPI_backupCameraCalibrated true
/usr/local/bin/sdv VAPI_fisheyeCameraCalibrated true
/usr/local/bin/sdv VAPI_lPillarCameraCalibrated true
/usr/local/bin/sdv VAPI_lRepeaterCameraCalibrated true
/usr/local/bin/sdv VAPI_mainCameraCalibrated true
/usr/local/bin/sdv VAPI_narrowCameraCalibrated true
/usr/local/bin/sdv VAPI_rPillarCameraCalibrated true
/usr/local/bin/sdv VAPI_rRepeaterCameraCalibrated true
echo "1" > /var/etc/dashw
echo "dashw 1" >> /var/etc/gateway.cfg
echo "autopilot 1" >> /var/etc/gateway.cfg
stop qtcar-audiod
stop qtcar
stop qtcar-carserver
start qtcar-carserver
start qtcar
start qtcar-audiod
References