Difference between revisions of "Tesla Model S preAP OBD2 port"
m (→Installing the Tinkla Chassis CAN Retrofit Harness) |
m (→Installing the Tinkla Chassis CAN Retrofit Harness) |
||
| Line 19: | Line 19: | ||
To install the Chassis CAN retrofit harness, there are two big steps: | To install the Chassis CAN retrofit harness, there are two big steps: | ||
| − | + | # adding the pins 1 (red) and 9 (black) to the existing OBD2 connector | |
| − | + | # connecting the other end of the harness to the diagnostic port | |
This [https://www.youtube.com/watch?v=UiQved6gt2U video] for a different product shows you what you have to do in order to remove the driver side foot-well cover. Take your time and watch the video first. The process is not complicated if you just follow it step by step. | This [https://www.youtube.com/watch?v=UiQved6gt2U video] for a different product shows you what you have to do in order to remove the driver side foot-well cover. Take your time and watch the video first. The process is not complicated if you just follow it step by step. | ||
Latest revision as of 18:04, 29 June 2023
Contents
Tinkla OBD-C Adapter and your car's OBD2 port
Tinkla OBD-C Adapter connects to your preAP Tesla Model S' OBD2 port in order to power the Comma devkit and also talk to your car's Chassis CAN bus. Depending on the year/month when your car was manufactured, your OBD2 port might or might not have the pins 1 and 9 (which have the Chassis CAN bus) populated. Do not despair, we have a solution for that.
In case you need to connect more than one device to the OBD2 port, a splitter like this one could make your life easier.
Checking your car's OBD2 port
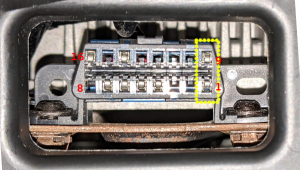
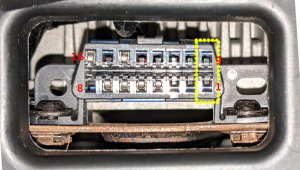
Locate your preAP Tesla Model S OBD2 port in the driver footwell. It is under the ceiling of the footwell, towards the outside of the car, close to the door. Will look like one of the two pictures above. One of those pictures show the pins 1 and 9 populated, one shows them not populated. Take a picture of the OBD2 connector and compare to the images. Which one do you have?
I have pins 1 and 9 populated
OK, then you are ready to just plug the Tinkla OBD-C adapter straight into the OBD2 port and install your Comma devkit and Tesla Unity software.
I do not have pins 1 and 9 populated
You're still OK. You can purchase the Tinkla Chassis CAN Retrofit Harness from our store. This easy to install harness will populate pins 1 and 9 on your vehicle with Chassis CAN signal taken from the Tesla Diagnostic Port from underneath your center console display. Takes very little time to install and is a permanent upgrade to your car. IF you are going to install a Tesla Pedal Interceptor too, you might want to do this at the same time, since you will have to remote the top of the footwell anyway.
Installing the Tinkla Chassis CAN Retrofit Harness
To install the Chassis CAN retrofit harness, there are two big steps:
- adding the pins 1 (red) and 9 (black) to the existing OBD2 connector
- connecting the other end of the harness to the diagnostic port
This video for a different product shows you what you have to do in order to remove the driver side foot-well cover. Take your time and watch the video first. The process is not complicated if you just follow it step by step.
Once you remove the foot-well cover, take your time and remove the two screws that hold the OBD2 connector in place. They are fairly painful to reach and takes time and a lot of weird yoga like positions to remove. Once the OBD2 connector is free, use a small flat screwdriver to take out the two blue tabs, insert the pins in the OBD2 connector then place the two blue tabs back. Now mount back the OBD2 connector in it's original location (few more yoga positions and you're done).
Now connect the other end of the harness to the Tesla diagnostic port. The port is located under the center console behind the little shelf. You can either pull down on the shelf or even access it sometimes the side (if you followed the steps in the video above).
Once both ends are connected try the whole system first before following the steps in reverse order to put the driver foot-well back together.

