Difference between revisions of "Pedal Interceptor"
m |
m |
||
| Line 22: | Line 22: | ||
The Comma Pedal is constantly sending the physical accelerator pedal's position to the CAN bus for Openpilot to read. | The Comma Pedal is constantly sending the physical accelerator pedal's position to the CAN bus for Openpilot to read. | ||
| − | === Obtaining a Comma Pedal === | + | === Obtaining a Comma Pedal (generic infor from Comma.ai wiki) === |
You cannot buy a pre-built comma pedal from Comma. Perhaps someone will begin selling them, but for now, you must either build it yourself (not recommended) Or have one fabricated through a service like Macrofab. | You cannot buy a pre-built comma pedal from Comma. Perhaps someone will begin selling them, but for now, you must either build it yourself (not recommended) Or have one fabricated through a service like Macrofab. | ||
| Line 32: | Line 32: | ||
The information needed to build one is located in Comma's [https://github.com/commaai/neo/tree/master/pedal EON GitHub repo.] | The information needed to build one is located in Comma's [https://github.com/commaai/neo/tree/master/pedal EON GitHub repo.] | ||
| + | |||
| + | === Wiring a Tesla Pedal === | ||
| + | [[File:Tesla pedal wiring.png|thumb]] | ||
| + | [[File:Pedal pinout.png|thumb]] | ||
| + | [[File:Pedal connector.png|thumb]] | ||
| + | [[File:Pedal CAN connection.png|thumb]] | ||
| + | In order to create your Tesla Pedal you need: | ||
| + | * 1x Comma Pedal board | ||
| + | * 1x [https://www.amazon.com/Connector-6-way-Accelerator-sensor-WPT-929/dp/B07GZY4ST4D set of WPT-929 connectors] w/ or w/o wires | ||
| + | * 1x JST2 male conenctor | ||
| + | * 1x JST2 female connector (or you can [https://www.digikey.com/product-detail/en/adafruit-industries-llc/1131/1528-1494-ND/5761282?WT.srch=1&gclid=EAIaIQobChMIjO_5yJyK4gIV1gOGCh1lOAh1EAQYAiABEgLflfD_BwE buy this] and cut it and you're done) | ||
| + | |||
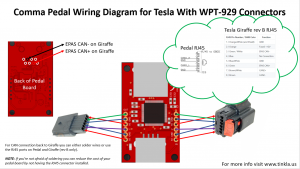
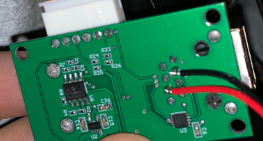
| + | Use the diagram to conenct the female WSP-929 pedal connector to the IN side of the pedal board and the male WSP-929 connector to the OUT side of the pedal connector. Use twised wire (preffered) to conenct to the positions 3 and 6 of the fake-ethernet port of the pedal board to the two JST2 connectors (male and female). We need both because you will plug the female one in the [[Tesla Giraffe|Giraffe's]] EPAS connector and then the EPAS Harness into the male JSP2. Red should be CAN+ and black should be CAN- (that's the convention also used in the image showing the CAN wire soldered to pins 3 and 6 of the fake ethernet port on the pedal baord). | ||
=== Guides for Building / Troubleshooting Your Comma Pedal === | === Guides for Building / Troubleshooting Your Comma Pedal === | ||
Revision as of 20:19, 7 May 2019
The Comma Pedal is used to provide acceleration and regen braking capability on Tesla cars running Openpilot that do not have iBooster installed.
The Comma Pedal is an accelerator pedal interceptor. It is a device that is inserted between a car's electronic gas pedal and the DU (Drive Unit). It detects the voltage from the accelerator pedal which represents the pedal's position. It then writes that same voltage back out to the DU as if the accelerator pedal had produced it. When Openpilot is engaged, Openpilot sends the virtual acceleration position through the Comma Pedal instead.
The Comma Pedal is connected to the Giraffe on CAN3-EPAS usually using a Y adapter (that you have to make).
Contents
What it Does
The Comma Pedal has 4 main systems:
- 2 Analog to Digital Convertors
- This is used to read the voltage from the car's accelerator pedal into the Comma Pedal's processor. The accelerator pedal produces an output Voltage between 0 and 5 Volts.
- 2 Digital to Analog Convertors
- This is used to send voltage back to the car's DU as if the accelerator pedal had produced it.
- 1 CAN Bus
- The CAN Bus is the car's communication network. The Comma Pedal communicates with Openpilot using the CAN Bus. It connects to the Tesla Giraffe on CAN3.
- 1 USB
- This is used to program and monitor the Comma Pedal, itself.
When Openpilot is NOT engaged, the Comma Pedal reads the voltage from the accelerator pedal and just passes it along to the DU.
When Openpilot IS engaged with longitudinal control, the Comma Pedal gets accelerator commands from Openpilot and emulates a accelerator pedal to the DU.
The Comma Pedal is constantly sending the physical accelerator pedal's position to the CAN bus for Openpilot to read.
Obtaining a Comma Pedal (generic infor from Comma.ai wiki)
You cannot buy a pre-built comma pedal from Comma. Perhaps someone will begin selling them, but for now, you must either build it yourself (not recommended) Or have one fabricated through a service like Macrofab.
More information on HOW to do that will be added to this wiki in the future.
You can find an article written by a community member on how to build your own through MacroFab:
Comma Pedal: Building with MacroFab by Joshua F. Rountree
The information needed to build one is located in Comma's EON GitHub repo.
Wiring a Tesla Pedal
In order to create your Tesla Pedal you need:
- 1x Comma Pedal board
- 1x set of WPT-929 connectors w/ or w/o wires
- 1x JST2 male conenctor
- 1x JST2 female connector (or you can buy this and cut it and you're done)
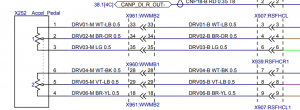
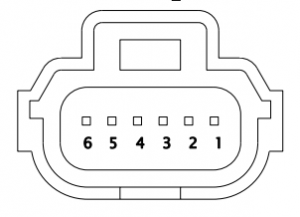
Use the diagram to conenct the female WSP-929 pedal connector to the IN side of the pedal board and the male WSP-929 connector to the OUT side of the pedal connector. Use twised wire (preffered) to conenct to the positions 3 and 6 of the fake-ethernet port of the pedal board to the two JST2 connectors (male and female). We need both because you will plug the female one in the Giraffe's EPAS connector and then the EPAS Harness into the male JSP2. Red should be CAN+ and black should be CAN- (that's the convention also used in the image showing the CAN wire soldered to pins 3 and 6 of the fake ethernet port on the pedal baord).
Guides for Building / Troubleshooting Your Comma Pedal
Comma Pedal: Updating the Firmware over CAN by @jfrux Use this guide to update your Comma Pedal for compatibility with Openpilot v0.5.10+
Comma Pedal: Building with MacroFab by @jfrux
Comma Pedal: Wiring the Connectors by @jfrux


