Difference between revisions of "Tesla Model S preAP OBD2 port"
(Created page with " thumb|preAP Tesla Model S OBD2 port with pins 1 and 9 populated File:OBD2 port without pins 1 and 9 populated.png|thumb|preAP...") |
m |
||
| Line 1: | Line 1: | ||
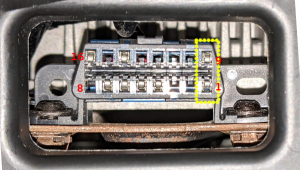
| + | [[File:OBD2 with pins 1 and 9 populated.png|thumb|preAP Tesla Model S OBD2 port with pins 1 and 9 populated]] | ||
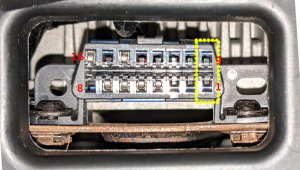
| + | [[File:OBD2 port without pins 1 and 9 populated.png|thumb|preAP Tesla Model S OBD2 port without pins 1 and 9 populated]] | ||
| + | == Tinkla OBD-C Adapter and your car's OBD2 port== | ||
| + | Tinkla OBD-C Adapter connects to your preAP Tesla Model S' OBD2 port in order to power the Comma devkit and also talk to your car's Chassis CAN bus. Depending on the year/month when your car was manufactured, your OBD2 port might or might not have the pins 1 and 9 (which have the Chassis CAN bus) populated. Do not despair, we have a solution for that. | ||
| + | |||
| + | == Checking your car's OBD2 port== | ||
| + | Locate your preAP Tesla Model S OBD2 port in the driver footwell. It is under the ceiling of the footwell, towards the outside of the car, close to the door. Will look like one of the two pictures above. One of those pictures show the pins 1 and 9 populated, one shows them not populated. Take a picture of the OBD2 connector and compare to the images. Which one do you have? | ||
| + | |||
| + | == I have pins 1 and 9 populated == | ||
| + | OK, then you are ready to just plug the Tinkla OBD-C adapter straight into the OBD2 port and install your Comma devkit and Tesla Unity software. | ||
| + | == I do not have pins 1 and 9 populated== | ||
| + | You're still OK. You can purchase the Tinkla Chassis CAN Retrofit Harness from our store. This easy to install harness will populate pins 1 and 9 on your vehicle with Chassis CAN signal taken from the Tesla Diagnostic Port from underneath your center console display. Take very little time to do this. IF you are going to install a [[Pedal Interceptor|Tesla Pedal Interceptor]] too, you might want to do this at the same time, since you will have to remote the top of the footwell anyway. | ||
| − | + | == Installing the Tinkla Chassis CAN Retrofit Harness== | |
| − | |||
Revision as of 18:56, 26 March 2022
Contents
Tinkla OBD-C Adapter and your car's OBD2 port
Tinkla OBD-C Adapter connects to your preAP Tesla Model S' OBD2 port in order to power the Comma devkit and also talk to your car's Chassis CAN bus. Depending on the year/month when your car was manufactured, your OBD2 port might or might not have the pins 1 and 9 (which have the Chassis CAN bus) populated. Do not despair, we have a solution for that.
Checking your car's OBD2 port
Locate your preAP Tesla Model S OBD2 port in the driver footwell. It is under the ceiling of the footwell, towards the outside of the car, close to the door. Will look like one of the two pictures above. One of those pictures show the pins 1 and 9 populated, one shows them not populated. Take a picture of the OBD2 connector and compare to the images. Which one do you have?
I have pins 1 and 9 populated
OK, then you are ready to just plug the Tinkla OBD-C adapter straight into the OBD2 port and install your Comma devkit and Tesla Unity software.
I do not have pins 1 and 9 populated
You're still OK. You can purchase the Tinkla Chassis CAN Retrofit Harness from our store. This easy to install harness will populate pins 1 and 9 on your vehicle with Chassis CAN signal taken from the Tesla Diagnostic Port from underneath your center console display. Take very little time to do this. IF you are going to install a Tesla Pedal Interceptor too, you might want to do this at the same time, since you will have to remote the top of the footwell anyway.

