Difference between revisions of "AP1 Harness"
From Tinkla: Tinkering with Tesla
m (→Parts Needed) |
m (→Making the Harness) |
||
| Line 9: | Line 9: | ||
[[File:AP1 Connector Diagram.png|thumb|AP1 Connector Diagram]] | [[File:AP1 Connector Diagram.png|thumb|AP1 Connector Diagram]] | ||
| − | == | + | [[File:AP1 Harness-3.jpg|thumb|Male connector and wires on PCB board]] |
| + | == The PCB Board == | ||
| + | * As you can see from the parts list, I did not find a male connector that has pins. This one is designed to be used in a PCB board. I had a development PCB board in my workshop, so I just used some string scisors and cut it to fit. If you don't have one, you can order one from [https://www.amazon.com/LampVPath-Prototype-Breadboard-Universal-Printed/dp/B07Y3GMWD9/ref=sr_1_16?crid=3EZYGNNKF2JRW&keywords=PCB%2Bboard&qid=1648841032&s=industrial&sprefix=pcb%2Bboard%2Cindustrial%2C50&sr=1-16&th=1 Amazon] or pick one up from your local electronics store, like MicroCenter. | ||
| + | * The best way is to go with the wires and the connector from the same side of the PCB board, the solder on the back. See picture of how my PCB board looked once I soldered it all together. | ||
Revision as of 19:30, 1 April 2022
Parts Needed
- A Comma Car Harness for Development Vehicle - $200.00
- 1 x TE Connectivity/AMP 1-1743284-2 - $4.42
- 1 x TE Connectivity/AMP 1-1743282-2 - $1.08
- 8 x TE Connectivity/AMP 5-963715-1-CT - unfortunately you can only by them in strips of 100 for $9.10
- about 20" of #16 automotive wire
The PCB Board
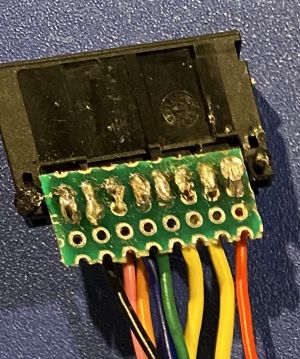
- As you can see from the parts list, I did not find a male connector that has pins. This one is designed to be used in a PCB board. I had a development PCB board in my workshop, so I just used some string scisors and cut it to fit. If you don't have one, you can order one from Amazon or pick one up from your local electronics store, like MicroCenter.
- The best way is to go with the wires and the connector from the same side of the PCB board, the solder on the back. See picture of how my PCB board looked once I soldered it all together.


