Difference between revisions of "Tesla Bosch Radar"
m (→What you need) |
m (→What you need) |
||
| Line 20: | Line 20: | ||
DIY people can also follow the old method using a 3D printed mount and a home-made harness. Keep in mind these mounts stay farther back, are influenced by the harness and 12V post that are close to them AND are not adjustable, aka can not be calibrated. But, if you like a challenge [https://docs.google.com/document/d/1rgxl7S7u-taUV4iiAu5chDT_CyEHzuKbsMeVpKdeSaw/mobilebasic David has a very nice set of instructions]. | DIY people can also follow the old method using a 3D printed mount and a home-made harness. Keep in mind these mounts stay farther back, are influenced by the harness and 12V post that are close to them AND are not adjustable, aka can not be calibrated. But, if you like a challenge [https://docs.google.com/document/d/1rgxl7S7u-taUV4iiAu5chDT_CyEHzuKbsMeVpKdeSaw/mobilebasic David has a very nice set of instructions]. | ||
| + | |||
| + | === Installing the radar kit === | ||
=== Modifying the configuration settings for radar === | === Modifying the configuration settings for radar === | ||
Revision as of 21:14, 4 January 2023
If you need instructions for the Tesla Bosch Radar to use with EON or other (non Tesla) cars, the information can be found here.
The Bosch radar made for Tesla (Bosch MRRevo14, and with few different part numbers like 1038224-00-A/B or 1057551-00-B) have been used on Tesla Model S cars from October 2014 (AP1) until they have been replaced by the Continental radar with AP2.5). The main difference between 1038224-00-B and 1038224-00-A is that the A version does not have the heater element for winter weather (to melt snow and ice).
The radar has a range of about 160m and for the short beam a cone of 45°.
Contents
Bosch radars
Many other car manufacturers use the same radar hardware, including Honda, Nissan, VW, Audi, etc. But Tesla (AFAIK) is the only one that reads and processes raw data from the radar instead of letting the radar make the decision about longitudinal control action needed (acceleration or deceleration).
This radar can ben used on any OP supported car. To insall the radar for a non-Tesla car please find a branch that has the code already done or modify your branch and add the code needed to make the radar talk to the Panda code for your car. More info available here.
Decoding the radar
With a little help from a group of enthusiasts, we were able to reverse engineer all the messages that AP sends to the radar in order to make it "talk". Then we identified the structure of the CAN messages that describe each of the 32 objects this radar can detect. Signals like longitudinal distance, lateral distance (vs radar), longitudinal relative speed, lateral relative speed, longitudinal acceleration, certainty of detection, etc are all now processed and sent to the radar daemon of OpenPilot, improving longitudinal control for the car.
What you need
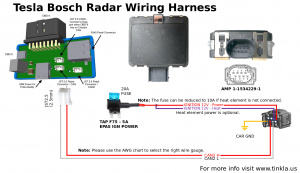
In order to get the radar working on your car, you need to buy a radar, a mounting bracket, and a radar harness and run the cable back to the Tinkla OBD-C Adapter.
DIY people can also follow the old method using a 3D printed mount and a home-made harness. Keep in mind these mounts stay farther back, are influenced by the harness and 12V post that are close to them AND are not adjustable, aka can not be calibrated. But, if you like a challenge David has a very nice set of instructions.
Installing the radar kit
Modifying the configuration settings for radar
It is important now to take the time to configure the setting in Tesla Unity in order to activate the radar. Before moving to the next step, please turn ON the toggle for Use Tesla Radar and appropriately configure the Radar behind nosecone and Radar offset.
Programming your radar - VIN Learning
Chances are you bought your Tesla Bosch Radar on ebay and was previously installed and programmed in a car (so it will only respond if we send the right VIN, epas type and position). In order to make the radar work on your car you will have to go through the Radar VIN Learn process that can be started using the button with the same name at the bottom of the Tesla preAP settings page.
- Ensure your Radar is installed in your vehicle and connected to the Tinkla OBD-C Adapter or to your specific harness.
- Ensure that all the settings are configured correctly for your radar, especially enabling the radar and specifying if it is behind the nose cone or not.
- Using the Radar VIN Learn button under the Tesla preAP tab of settings start the programming process
- Before hitting the VIN Lrn button, ensure your car is on (in P - Park) and continue to keep your foot on the brake throughout the process.
- Hit the VIN Lrn button and the screen will show the progress. Your car might emit warnings and sounds during this process, which is normal.
- Once process is complete, allow the car to go in "CAR OFF" mode and reboot your Comma devkit.
- You are now ready to use your Tesla Bosch Radar.
Calibrating your radar
Most likely the radar will have to be calibrated in order to ensure the correct data being fed into OpenPilot. In order to calibrate your radar you will need:
- the calibrateRadar.py script which for those running on one of my Tesla branches is located in /data/openpilot/selfdrive/car/tesla/radar_tools/
- a 4ft (120 cm) metal pole that can stay vertically by itself (I personally use a microphone stand)
- a 3.5mm hex head nut driver with a long neck that can fit through the front grille holes
- tape measure
- chalk
- computer or phone to SSH into EON and view data
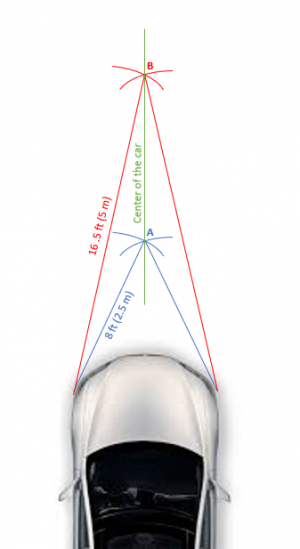
First, we need to create a straight line that is perfectly centered on the car (for this you will need another person to hold one end of the tape). Follow these steps:
- start from the left front wheel well, measure 8 ft (2.5m) out towards the center of the car and draw an arch of the circle using the chalk.
- repeat the process from the right front wheel
- the place where your two arches intersect will be point A. (see blue lines in diagram)
- repeat the process above but measure out 16.5 ft (5 m)
- the place where your two new arches intersect will be point B (see red lines in diagram)
- connect points A and B with a line; this line is now along the center of the car (see green line in diagram)
Now that we have the line that marks the zero dY line, let's start the calibration script:
- start OP (OP might stop when you leave the car; what i did was to leave open the driver window, put a heavy backpack on the driver seat, connect the driver seatbelt and turn the car on; this way it ensured that OP remained running)
- SSH into EON and go to the folder where the calibrateRadar.py is
cd /data/openpilot/selfdrive/car/tesla/radar_tools/
- set the python environment
export PYTHONPATH="/data/openpilot/"
- run the calibration script
python calibrateRadar.py
The script will start showing data for objects between 8 ft (2.5 m) and 15 ft (4.5 m) in front of the car.
Now the calibration process starts:
- place the metal pole (again, i used a microphne stand) in the middle of the line that connects A and B
- look at the terminal window running the calibration script and check x and y values for distance:
- you should see data from the script showing dRel and dY as some of the points; keep in mind the values are always in meters
- measure the distance between the radar and the pole: it should match the dRel distance
- dY should be 0.0
- if you can not see the pole at all or dRel is greater than the real measured distance, you will need to adjust the radar vertically until they match.
- if dY is not zero, adjust the radar position Left or Right until dY is 0.0
- once dY is 0.0 move the pole along the line connecting A and B repeating the above process
- you are done when no matter where you place the pole between A and B, dY is always 0.0
Troubleshooting the Tesla Bosch Radar
The radar sends data for the first 5 seconds no matter what we send to it. But if we are sending the wrong info (VIN, position or epas) it will stop sending changes to the data after 5 seconds. At this point we have to see what exactly is happening with the radar by looking at the alerts it generates.
In order to do so you can run the script created to get the errors from the radar.
- start OP
- SSH into EON and go to the folder where the getRadarErrorCodes.py is
cd /data/openpilot/selfdrive/car/tesla/radar_tools/
- set the python environment
export PYTHONPATH="/data/openpilot/"
- run the calibration script
python getRadarErrorCodes.py
The script will start showing errors from the radar (if present) or say No Errors if everything works as expected.

